I always knew that Excel could be used to create some amazing drawings, but this week's tip shows some new uses for Excel. These ideas are from Don Heckerman a former associate from my days at Telxon. Don is now the head of I.T. infrastructure in the Americas for a global logistics company. He recently purchased copies of Mr Excel On Excel for his entire management team given that they all use Excel extensively. I really like the cool spreadsheets that Don sent in to show how he uses Excel outside of work.
Don realized that if he carefully set the height and width of the cells so that they were of equal size, then the Excel worksheet appeared just like graph paper. If you've ever used graph paper to sketch out plans for a basement renovation, you will appreciate the drawing that Don made in Excel. Here is a portion of a drawing that Don made for the contractor who was adding an all season room to his house with a basement under it.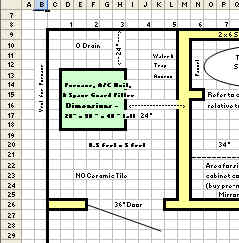 The key to this is getting the height and width of each square to be identical. This is not as easy as it sounds. In Don's example, the height of each row is 15. Row height is measured in points and is universal from computer to computer. However, column width is different. A column width of 9 indicates that an average number of 0-9 digits that can fit in the column using the standard font. This is the font used in the Normal style, and can vary from spreadsheet to spreadsheet. Don's computer has a standard font of Arial. My computer has a standard font of Times New Roman. You can adjust your standard font by selecting Tools > Options > General from Excel.
 For Don, he set the spreadsheet up to have a column width of 3 and each cell appears onscreen as a perfect square. If you have a different standard font, you will have to adjust the column width slightly.Update! In September 2004, Robert Linggoputro wrote with a handy way of finding the right column width.
- Using the drawing toolbar, choose the rectangle icon and draw a rectangular box on the worksheet.
- Right-click the box. Choose Format Autoshape. On the Size tab, change the size to 1" x 1"
- On the properties tab, change properties to "don't move and size with cells "
- Using View - Zoom, adjust the worksheet to maximum
- Place the box to the most upper left corner (cell A1)
- Adjust row and column size of cell A1 manually until it match with size of the box
- read the row and column scale and use it to update the whole row and column.
- try printing couple of times to fine tune them.
1. First -- click on the box to the left of column A to select all cells.
2. Second -- click on any one of the vertical lines that separates two of the columns. For example, click on the line between the "A" and "B" columns.
3. Start dragging the vertical line left or right.
When doing so -- only one of the columns will expand or contract.
A tool tip box will be displayed on the screen -- noting the width of the column in both inches and pixels
The key is to refer to the number of pixels
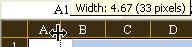
4. Determine how many pixels wide you want the column width to be, then stop moving the mouse
When you stop the dragging and let up from the left mouse button -- all the columns will have been expanded or contracted
5. Third -- click on one of the horizontal lines that separates two of the rows. For example, click on the line between row 1 and row 2.
6. Start dragging the horizontal line up and down
When doing so -- only one of the rows will expand or contract
A tool tip box will be displayed on the screen -- noting the row height in both inches and pixels
As with the columns above -- the key is to refer to the number of pixels.
7. Continue the dragging of the horizontal line (either up or down) until the number of pixels for the row height is equal to the number of pixels for the column width (that you previously specified - - in step 4 above).
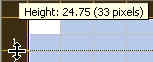
8. When you stop the dragging and release the left mouse button -- all the rows will have been expanded or contracted and the dimensions of the columns and rows will be identical.In three mouse clicks, you have set the cells to be square.
Thanks to Seth for this tip.Update!! In July 2006, Michael Pemberton sent in this macro to automate the process of creating gridpaper. You might want to try this if you need to make gridpaper often.
Sub MakeSquareCells2()
Dim wid As Single
Dim myPts As Single
Dim myRange As Range
'get from user the range to make square cells in.
On Error GoTo TheEnd
Set myRange = Application.InputBox _
("Select a range in which to create square cells", Type:=8)
On Error Resume Next
If myRange.Cells.Count = 0 Then Exit Sub
GetWidth:
'get from user the width of the cells
wid = Val(InputBox("Input Column Width: "))
If wid > 0 And wid < 0.05 Then
MsgBox "Invalid column width value"
GoTo GetWidth
ElseIf wid <= 0 Then Exit Sub
End If
'don't drive the person crazy watching you work
Application.ScreenUpdating = False
myRange.EntireColumn.ColumnWidth = wid
myPts = myRange(1).Width
myRange.EntireRow.RowHeight = myPts
'show the person what you've done
Application.ScreenUpdating = True
TheEnd:
End Sub
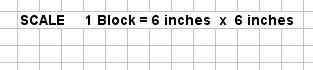
Thanks to Michael for sending this in!Don decided on a scale that each block is 6 inches by 6 inches.
 Don uses a combination of cell borders and patterns to create the interior walls of his drawing. Here, he used a line from the Drawing toolbar to show a door.
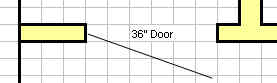 Don writes, "I wanted to be able to put my ideas on paper and then share them with my contractor. I did not want to have to learn a CAD package. So I decided to use Excel. By making the dimensions of the rows equal to those of the columns -- you have a huge piece of graph paper. WOW ! I used this concept to prepare all my architectural drawings."Below is a far more detailed architectural drawing of the rear of Don’s home showing the new extensive deck and the new All Season Room (the large rectangular box to the left in the drawing) that he and Anne (his wife) designed using Excel. Their contractor used these drawings exclusively during the construction. No other architectural drawings were required, given the detail provided by the Excel drawings. I had to scale it to 15% to have it fit the width of this page, but the drawing itself is comprised of 150 columns by 100 rows.
 Below is a wiring diagram that Don prepared for a re-wiring project for his 1923 T-Bucket Hot Rod. At the top of the diagram is the front of the car, showing the headlights and the amber turn signal lights. At the bottom of the diagram is the rear of the car, showing the red brake lights, the center license plate light, and the amber turn signal lights.
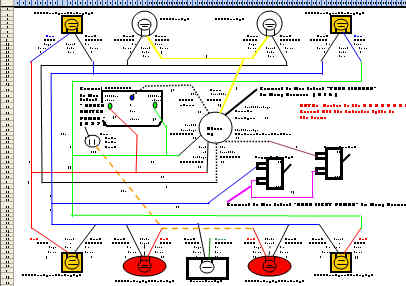 Here is a detail of one section of the wiring diagram.
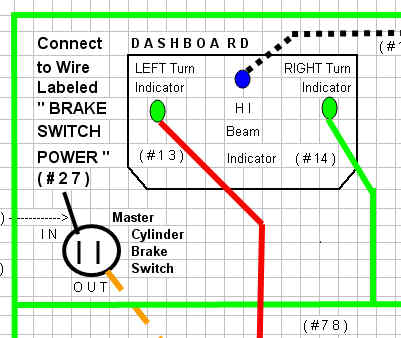
No comments:
Post a Comment